


1. Introduction
Steampunk is a sub-genre of fantasy and speculative fiction that came into prominence in the 1980s and early 1990s. The term denotes works set in an era or world where steam power is still widely used – usually the 19th century, and often Victorian era England – but with prominent elements of either science fiction or fantasy, such as fictional technological inventions like those found in the works of H. G. Wells and Jules Verne, or real technological developments like the computer occurring at an earlier date. – Courtesy of Wikipedia.
cleared that up, let’s work through creating a rich Steampunk inspired image.
2. Assets
The final image is made up of lots of assets, however, feel free to substitute any of the suggested assets out or add anymore to your work. Bear in mind that Steampunk draws from steam driven technology, largely from the Victorian era, and puts a futuristic spin on it. The asset list is as follows:
- Man
- Goggles
- Hat
- Hat Ornament
- Compass
- Tap
- Belt
- Hanging Watch
- Brass Tank
- Building
- Chimney
- Cloud
- Cogs
- Electric Meter (thanks to Phillip Flores for this image)
- Lightbulb
- Moustache (thanks to Constantin Jurcut for this image)
- Paper Texture
Step 1
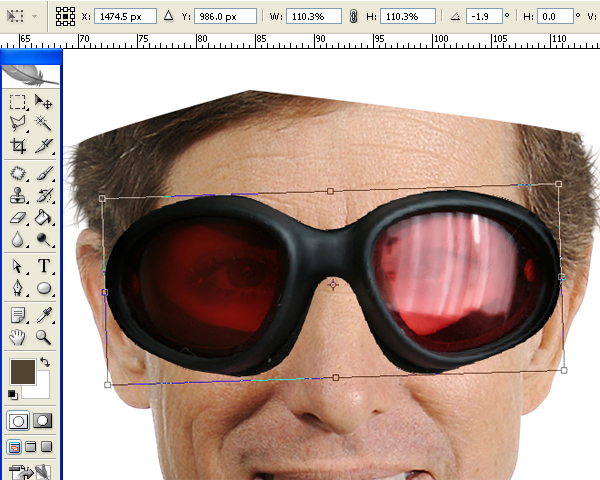
Create a new document of 260mm by 210mm at 300dpi. Download the Man image from iStockphoto.com and the Goggles from sxc.hu.
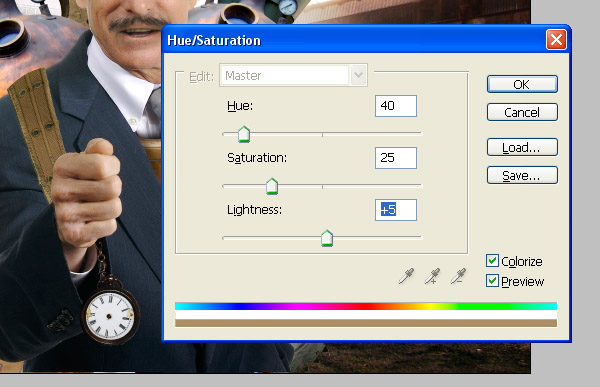
Cut the goggles out using the Pen Tool, import them into your blank document and call the layer “GOGGLES.” Import the Man image into the document and call it “MAN.” Position the goggles on the face and resize to fit. Then reduce the “GOGGLE” layer saturation (Image > Adjust > Hue/Saturation) to -37.
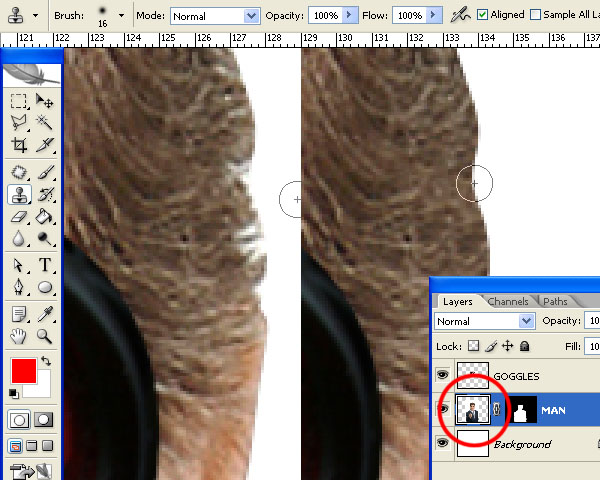
Draw around the man using the Pen Tool, don’t worry about perfectly cutting out the hair as there is a quicker method suitable for our needs here. Keep it fairly loose and once you’ve finished the path, turn it into a selection and create a layer mask (Layer > Layer Mask > Reveal Selection).

Select the “MAN” layer, rather than the Layer Mask, and use the Clone Stamp Tool to clone in hair to fill in the gaps. Ensure you clone hair beyond the boundaries of the Layer Mask.
Select the Smudge Tool, set up as in the screen grab and smudge the Layer Mask (not the layer itself) to reveal more hair underneath.
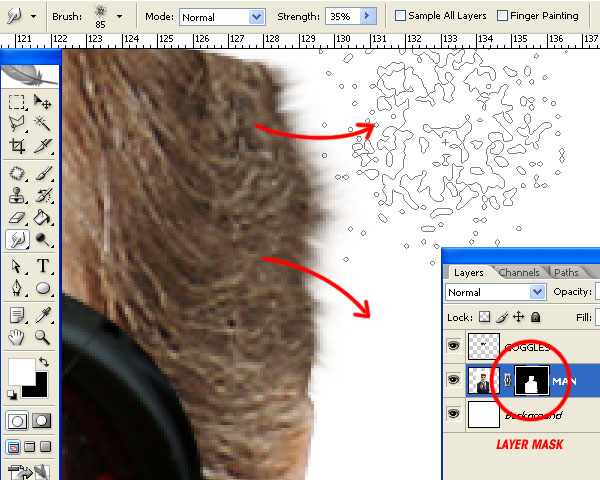
Apply the Layer Mask (Layer > Layer Mask > Apply) and select the Smudge Tool. Change the brush to 2 pixels with 0% Hardness, and set the smudge strength to between 70 and 85. Smudge extra hairs following the direction of the hairs. Mix up the smudge strength to avoid a uniform hair length.

Step 2
Open the Hat image from sxc.hu and draw a Path around it using the Pen Tool. Turn the Path into a selection (Go to the Paths palette, select the Path, and right click on it), then copy and paste the hat into the working document. Call the Layer “HAT” and resize to 56%.
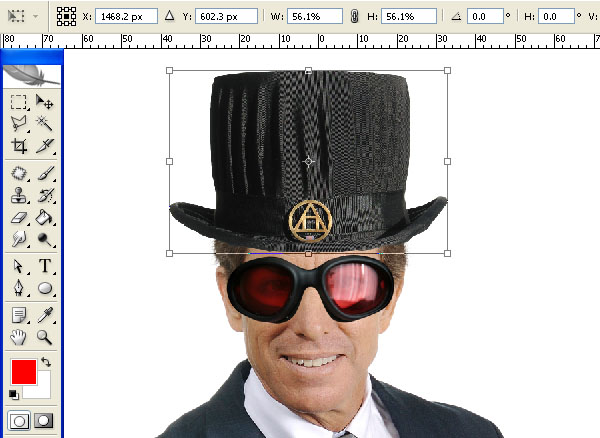
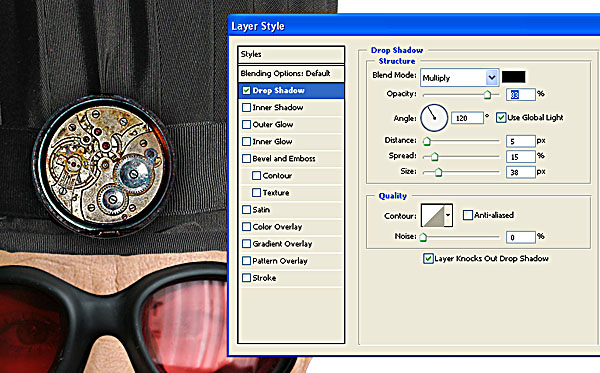
Open the Hat Ornament image from sx.hu, and cut and paste it into the working document. Call the Layer “WATCH” and resize it to 38.5%. Go to Layer > Layer Style > Drop Shadow and set it up as shown.
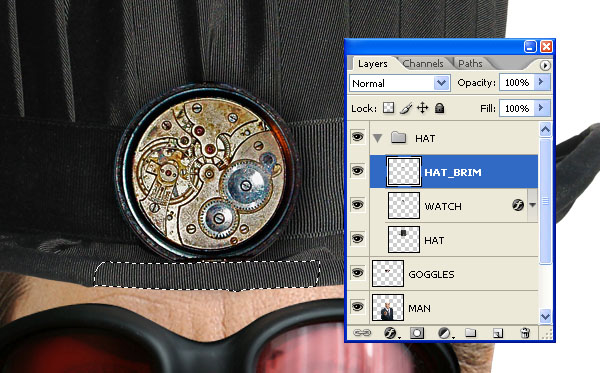
Select the “HAT” layer and draw a path around the part of the brim that lies beneath the “WATCH.” Copy and paste this into a new layer. Move the layer above the “WATCH” layer and call it “HAT_BRIM.” Select all three layers attributed to the Hat and group them (Layer > Group Layers), as we’ll be building up a lot of layers throughout this tutorial. It’s a good practice to group layers where possible.
Step 3
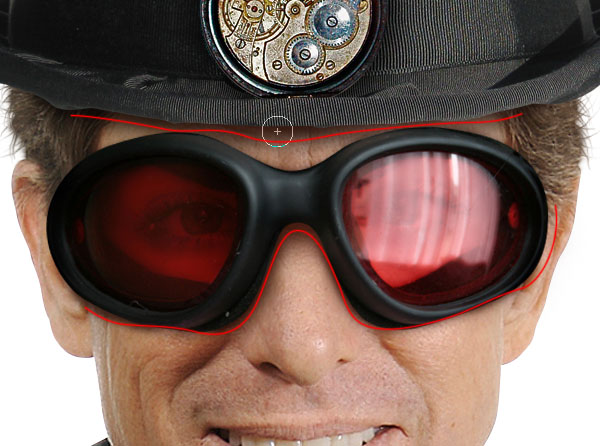
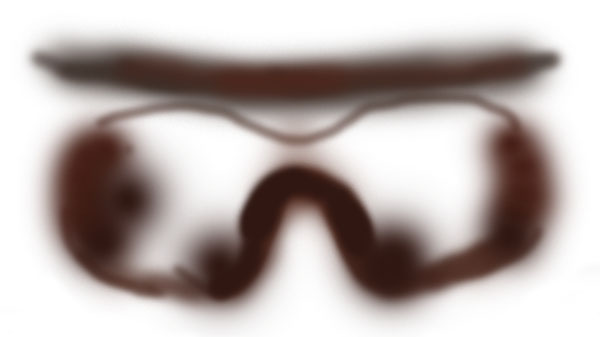
Create a new layer in between the “MAN” and “GOGGLE” layers. Call this new layer “FACE_SHADOW” and set it’s Blend Mode to Multiply. Use the Eyedropper Tool to sample dark colors from the skin. Select the Paintbrush Tool and select a 40 pixel brush at 0% Hardness. Set the Flow to 25% and begin drawing shadows around the goggles and the hat.
Bear in mind that the contours of the face against the hat and goggles will produce an uneven shadow, and parts of the shadow closest to the source are darker than those that fall furthest away. Use a smaller brush to draw in the stronger parts of the shadow and make a bigger brush to blend out the shadow. You may need to resample the color using the Eyedropper Tool to satisfy the necessary shade of shadow required.
Step 4
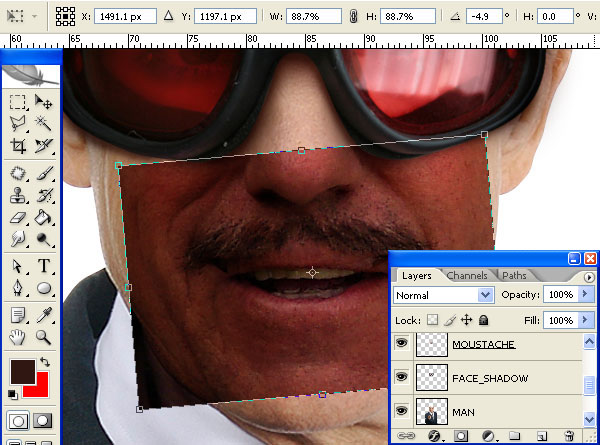
Open the Moustache (thanks to Constantin Jurcut for this image) image from sxc.hu. Use the Rectangular Marquee Tool to select the moustache area. Cut and paste in into the working document above the “MAN” layer, call the new layer “MOUSTACHE.” Set the Blend Mode to Multiply so you can see the “MAN” underneath, and resize and rotate until it fits.
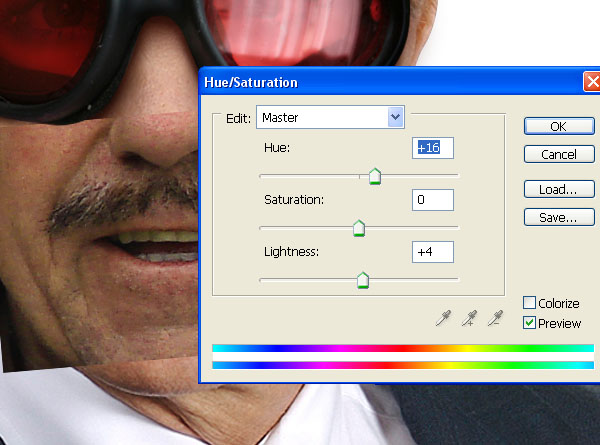
Adjust the Hue/Saturation so it better matches the “MAN” skin tones.
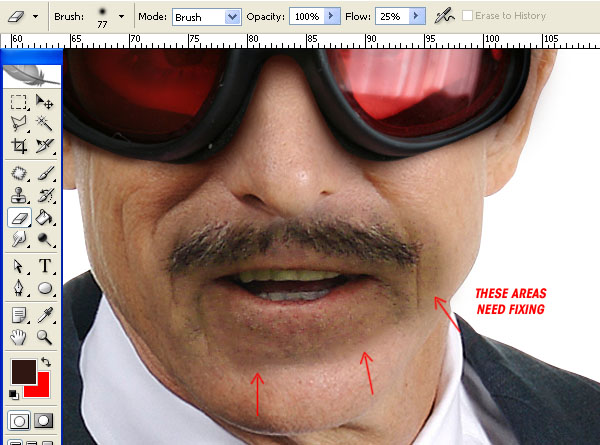
Use a soft-edged Eraser with a 25% Flow to erase the hard edges of the “MOUSTACHE” layer. Drag the Eraser round at this point. You can see where the two layers meet creating a harsh blend, which looks unnatural.
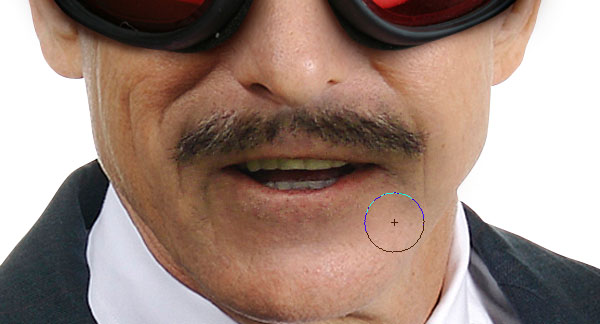
To create a natural blend between the two, single click on the darker areas of the “MOUSTACHE” layer until it blends well.
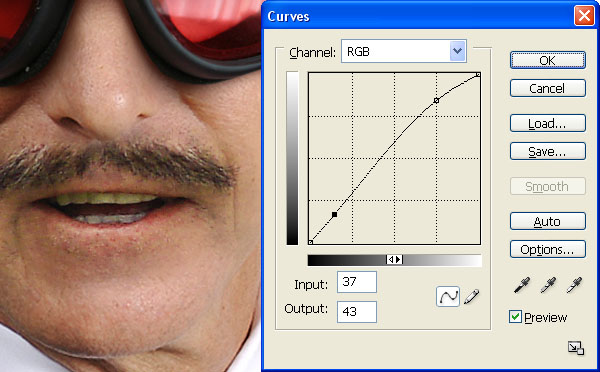
Finally, add a Curves Adjustment Layer (check the box marked Use Previous Layer To Create Clipping Mask) and tweak until you’re happy that the “MOUSTACHE” layer matches the “MAN” layer. Select the “MAN,” “FACE_SHADOW,” and “MOUSTACHE” layers, then group them, and name the group “MAN.”
Step 5
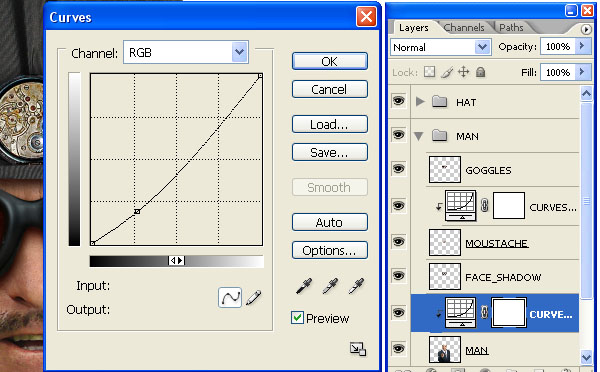
At this stage, the “MAN” seems a little lighter than the rest so add a Curves Adjustment Layer just above the “MAN” layer, checking the box marked Use Previous Layer…
Step 6
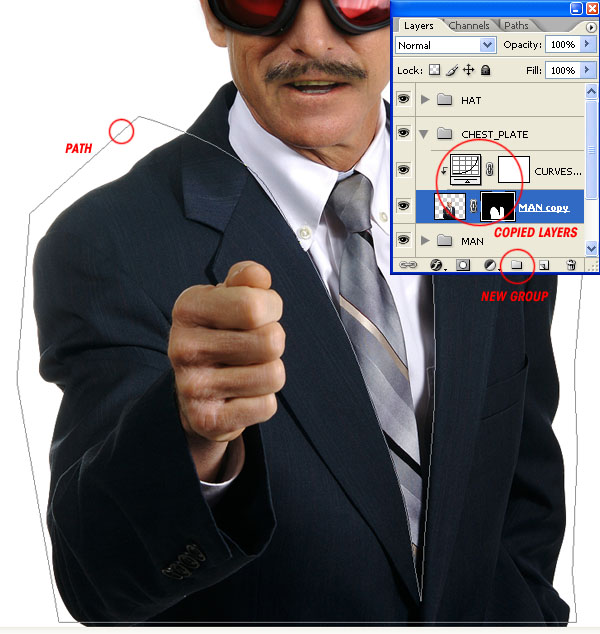
Create a new Group above the “MAN” group and call it “CHEST_PLATE.” Select “MAN” and it’s linked Curves Adjustment Layer and duplicate it. Move the duplicates into the “CHEST_PLATE” group. Draw a path that selects the jacket area but not the shirt or head area. Turn the finished path into a Layer Mask for “MAN copy.”
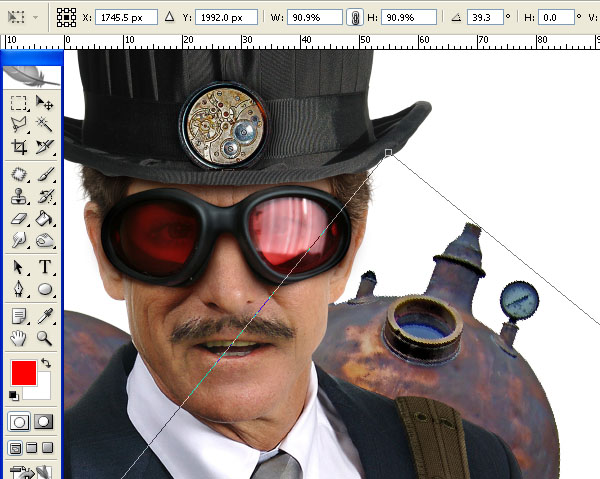
Open the Compass image from sxc.hu and draw a Path around the section as shown.
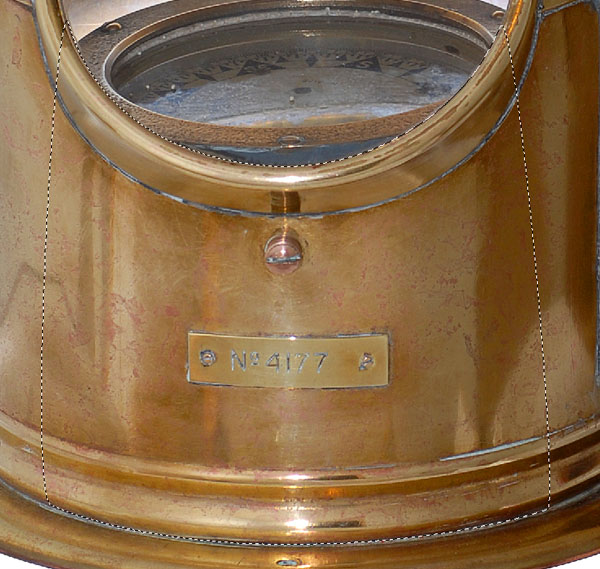
Position it within the “CHEST_PLATE” layer group below “MAN copy.” Call this new layer “CHEST_PLATE.” Press Command + T to bring up the Freeform Transform Tool and manipulate as show. Press and hold Command to manipulate points individually.
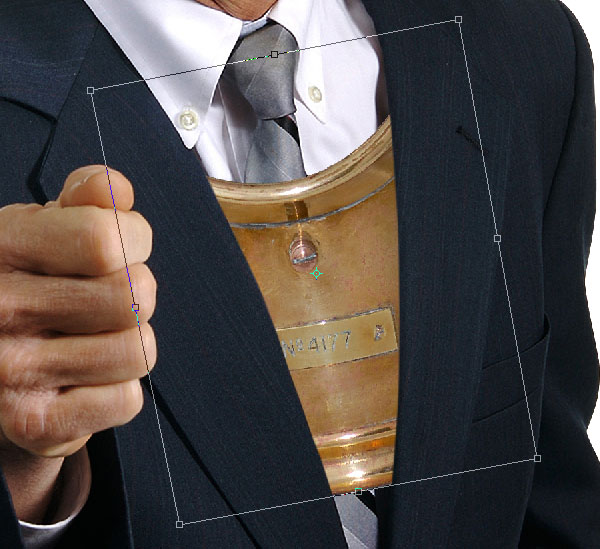
Use the Clone Stamp Tool to fill in the areas in which the chest plate doesn’t reach.
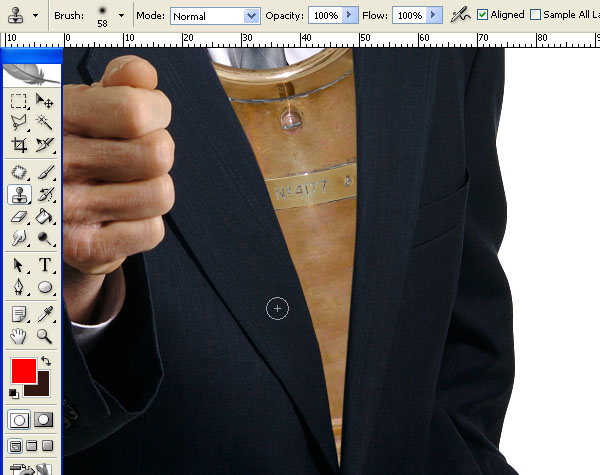
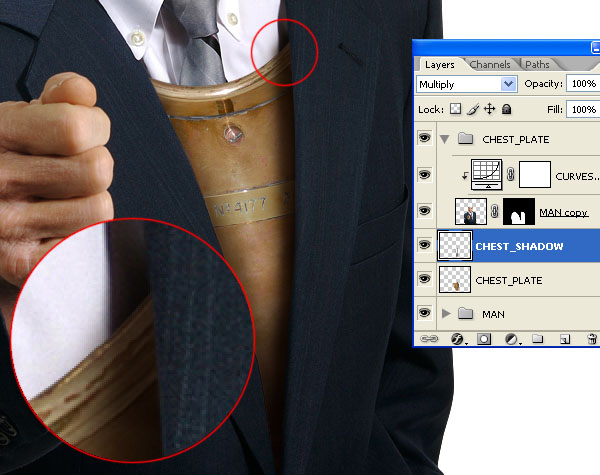
Add a new layer between “MAN copy” and “CHEST_PLATE,” and call it “CHEST_SHADOW.” Set the Blend Mode to Multiply and create a shadow as you did in Step 3. Try and mimic the shadow left on the shirt by the jacket. This will make it seem more natural.
Step 7
Open the Tap image from sxc.hu and cut and paste it into the working document. Position it above the “CHEST_PLATE” in the Layers palette and call it “TAP.” Resize it to position over the chest plate.

Create a new layer for the taps shadow. Draw in shadows as before.
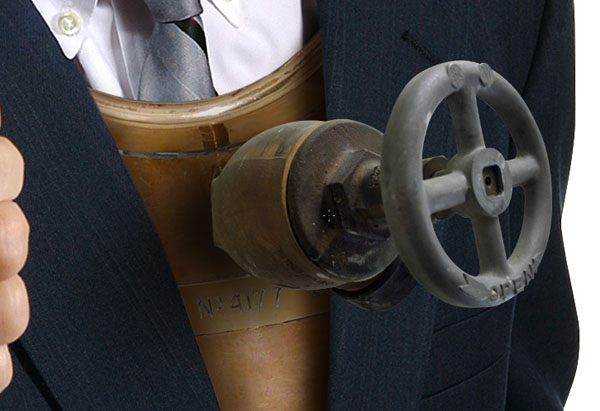
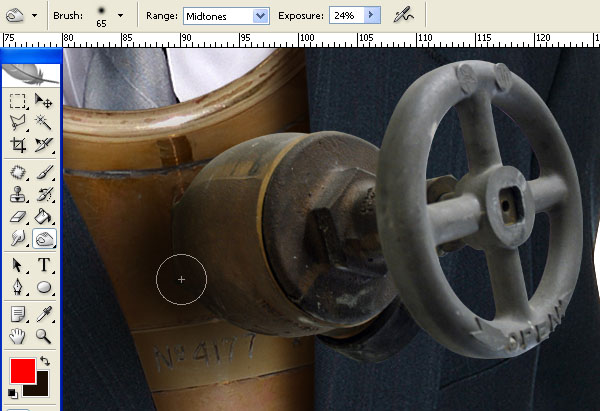
The shadow shows up how light the bottom of the tap is. Select the “TAP” layer and use the Burn Tool to darken the taps base. Set the Range to Midtones and the Exposure to around 25% before applying.
Create a Curves Adjustment Layer for the “TAP” layer and set it up as shown. Your Layers palette (CHEST_PLATE group) should now resemble the image below…
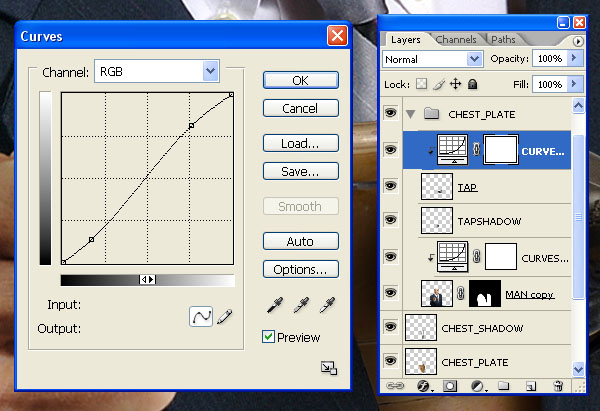
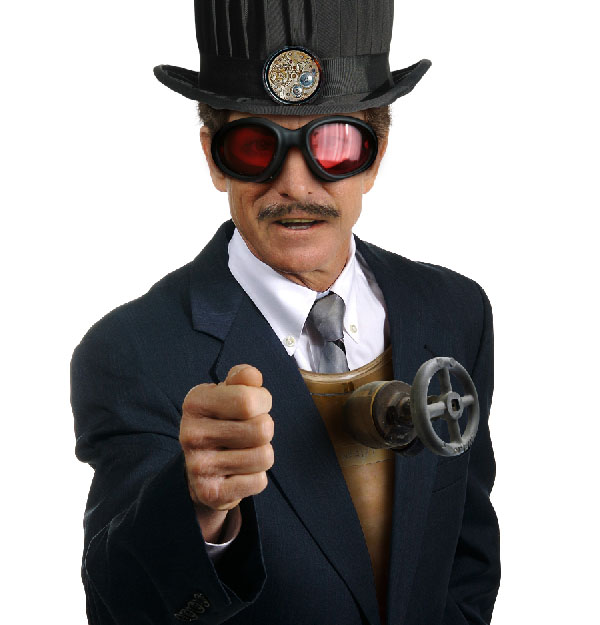
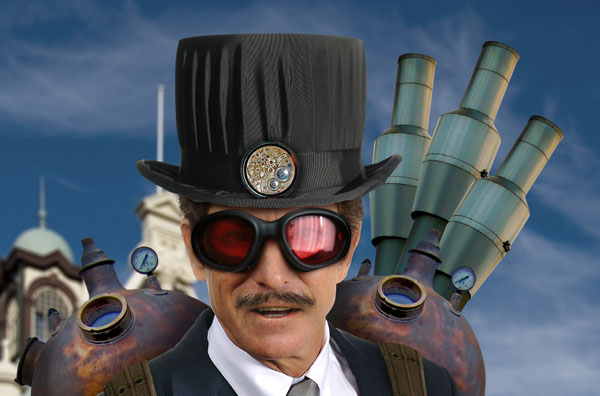
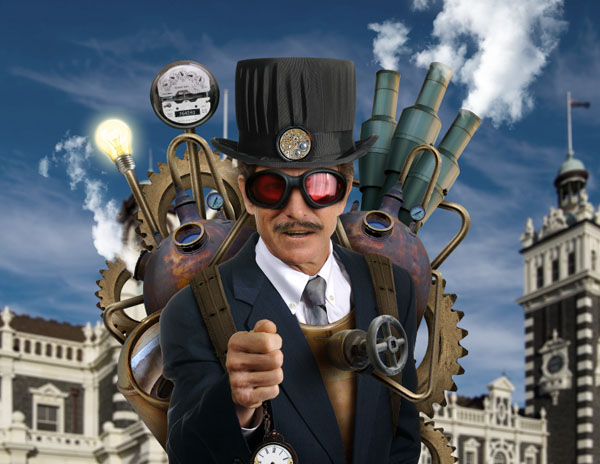
… and your Steampunk should look like this so far.
Step 8
Either scan in a belt, strap or something, or open the Belt image I scanned. Cut, copy and paste it into the working document and call it “BELT_LEFT.” Duplicate this layer and call the copy “BELT_RIGHT.”
Taking one belt at a time, use Freeform Transform (Command + T) to resize and rotate it to fit as shoulder straps. Before applying the transformation (so the bounding box is still visible) go to Edit > Transform > Warp and manipulate the grid handles and points.
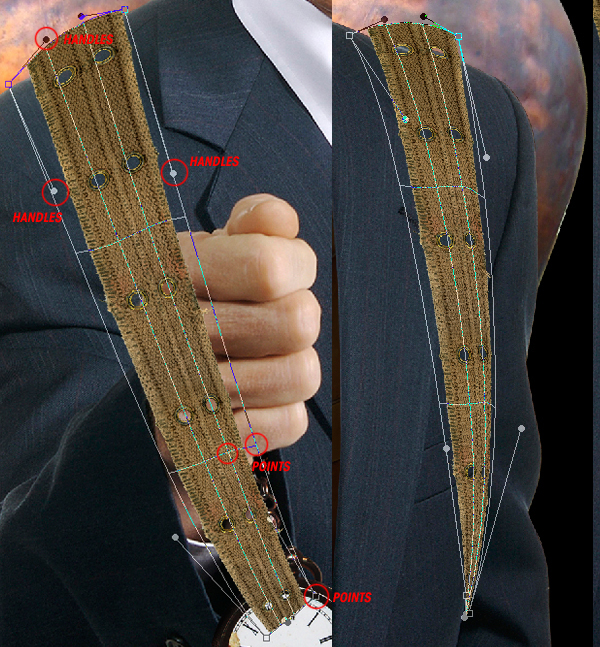
Now to make the belts appear 3D. Select “BELT_LEFT” and select the Move Tool (V). Hold down the Alt key and press the down arrow key once. This will create a duplicate layer and nudge it down once. Release the Alt key and press the left arrow. Repeat the same procedure using “BELT_LEFT” copy as the source layer.
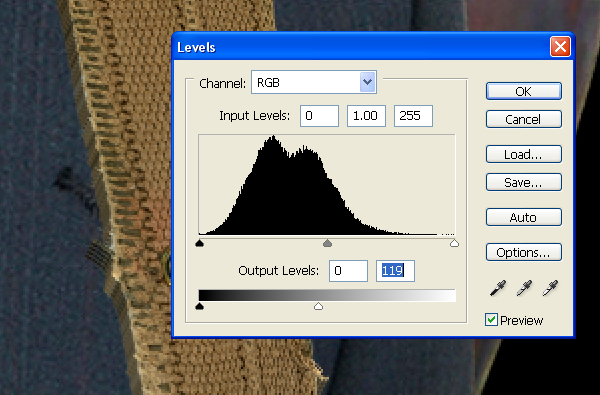
Stack 4 or so layers in this fashion and then reorganize them so the furthest from the original “BELT_LEFT” layer is lowest in the layers palette. (Top: “BELT_LEFT,” “BELT_LEFT copy,” “BELT_LEFT copy 2,” and “BELT_LEFT copy 3″). Select all the “BELT_LEFT” layers and merge them, then adjust the Levels as shown. Repeat this process for “BELT_RIGHT.”
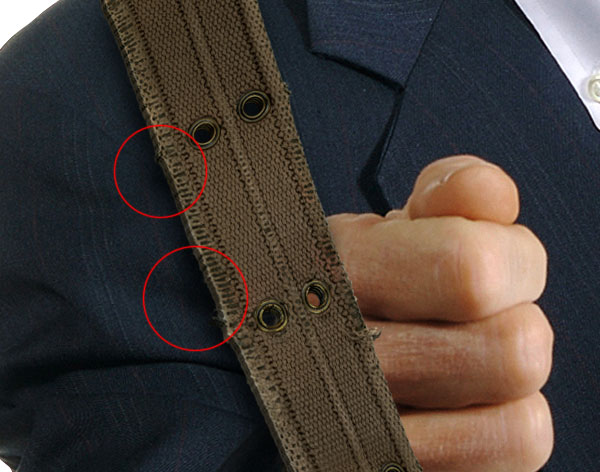
Add a shadow layer (“BELT_SHADOW”) beneath the merged “BELT_LEFT” and “BELT_RIGHT” layers and set the Blend Mode to Multiply. Add a shadow in the same manner as before. Take note of the uneven jacket surface, the rule of thumb is the closer to the surface the casting object is, the thinner and sharper the resultant shadow. The circled parts are where the shadow is at its biggest and softest, use an appropriate brush to reflect this.
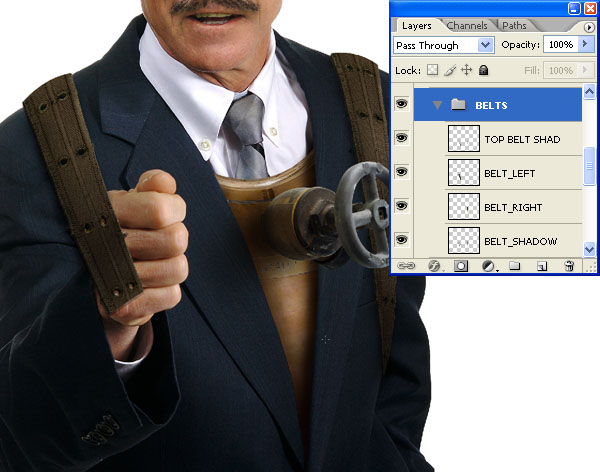
Create another shadow layer (“TOP_BELT_SHAD”) above the “BELT” layers and create the shadows as shown. Group all the “BELT” and associated “SHADOW” layers in a group called “BELTS” and situate this in the “CHEST_PLATE” layer group.
Step 9
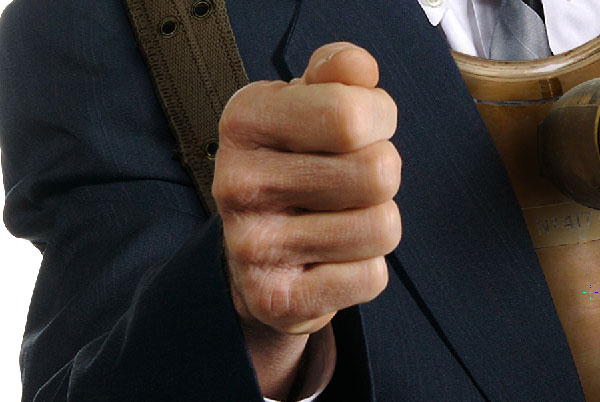
Select the MAN layer and use the Pen Tool to draw a Path around a portion of the clasped hand. You’ll need to get enough hand to obscure where “BELT_LEFT” overlaps. Turn this Path into a selection and copy and paste it onto a new layer called “HAND.” Move this layer above the “BELTS” layer group within the “CHEST_PLATE” layer group.

Select the “MAN” Curves adjustment layer and duplicate it. Move it directly above “HAND” and go to Layer > Create Clipping Mask.
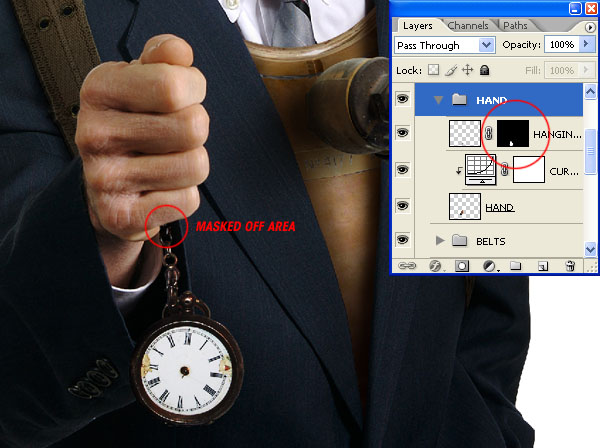
Open the Hanging Watch image from sxc.hu, cut, copy and paste it into the working document, and place it over the “HAND” layer. Call this layer “HANGING_WATCH,” resize it to fit the perspective and proportions of the hand. Select any overlap between “HANGING_WATCH” and “HAND” with the Polygonal Lasso Tool and go to Layer > Layer Mask > Hide Selection.
Select the layer mask and apply a 0.8 pixel Gaussian Blur. Group all these layers into a group called “HAND” and place it directly above the “BELT” layer group within the “CHEST_PLATE” layer group.
Step 10
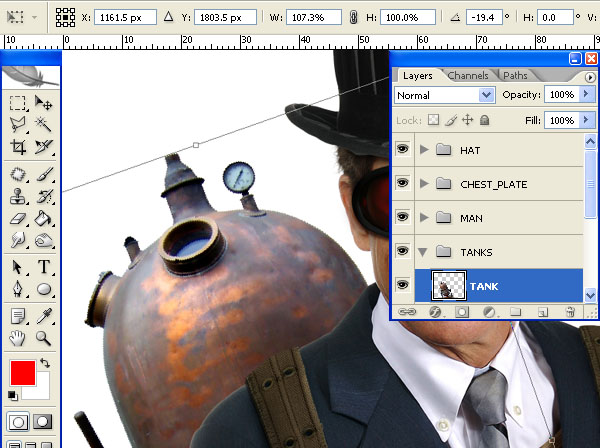
Open up the Brass Tank image from sxc.hu, cut it out and copy and paste it into the working document. Call this “TANK.” Create a new Layer Group called “TANKS” and place “TANK” into it. Press Command + T to bring up the Freeform Transform Tool and rotate and resize as shown.
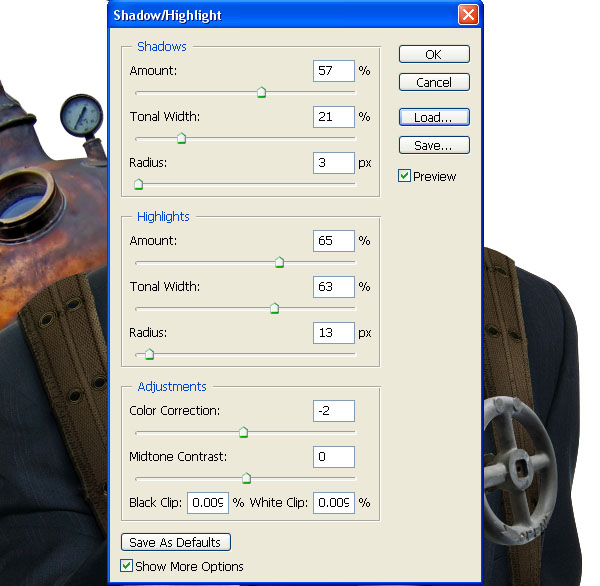
Go to Image > Adjustments > Shadow/Highlight and set up shown.
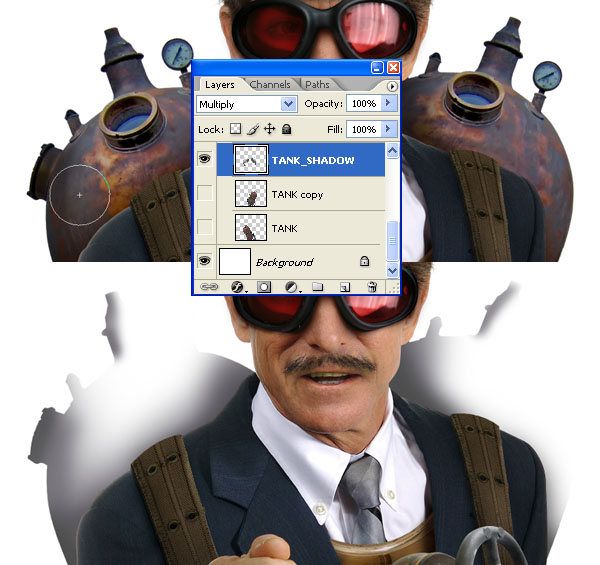
Duplicate the “TANK” layer and freeform transform as shown.
Create a new layer above the two “TANK” layers and call it “TANK_SHADOW.” Set the Blend mode to Multiply and add a shadow as before. See the image below for reference. The shadow pattern is based on the “MAN layers light and shadow pattern, try and visualize the light source in relation to the “MAN” layer and therefore, in relation to the “TANK” layers as well.
Step 11
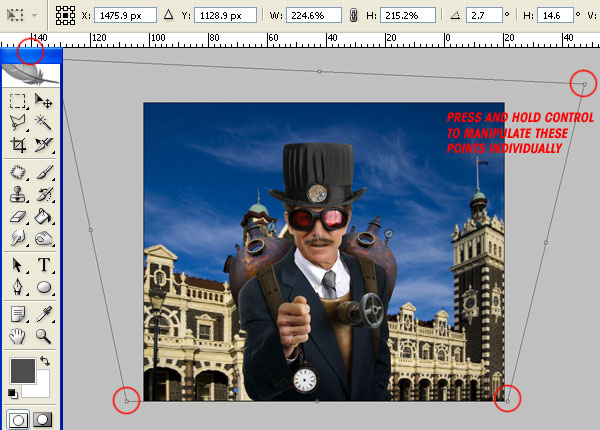
Open the Building image from sxc.hu and paste the whole image into the working document. Call the layer “BUILDING”" and move it to the bottom of the Layers palette. Press Command + T to get the Freeform Transform bounding box and manipulate the points as shown. The goal is to fix the lens distortion and the perspective.
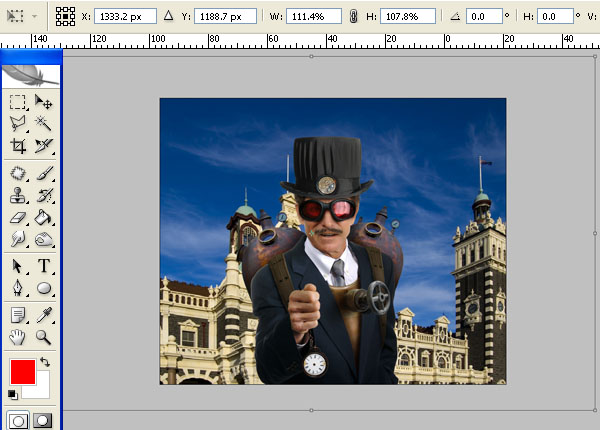
I resized the “BUILDING” layer at this point to get a better composition.
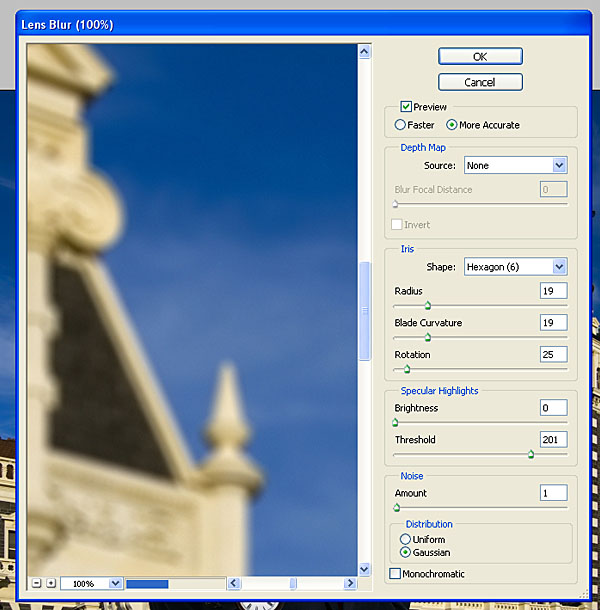
Then go to Filter > Blur > Lens Blur and apply the settings shown below. You can use Gaussian Blur instead if your system chokes on the Lens Blur, but it is less effective.
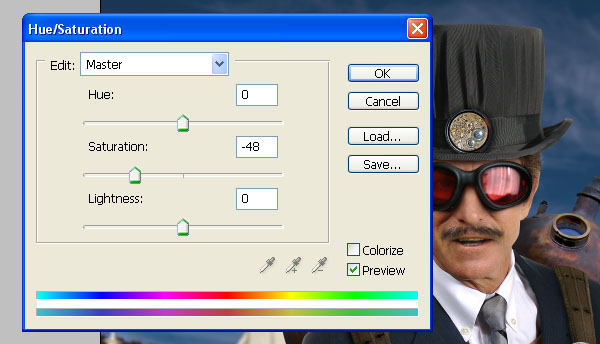
Go to Layer > New Adjustment Layer > Hue/Saturation and slide the Saturation handle to -48.
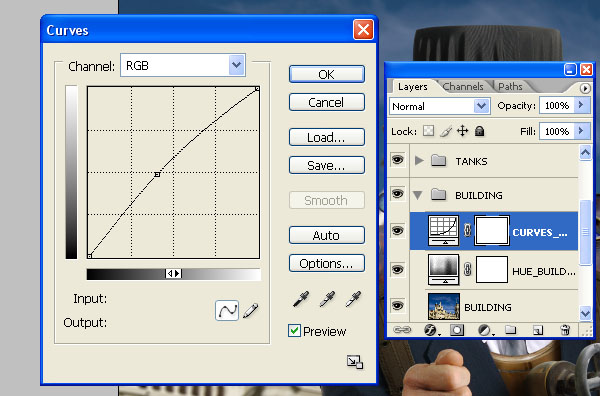
Then add a Curves Adjustment Layer directly above the Hue/Saturation one.
Step 12
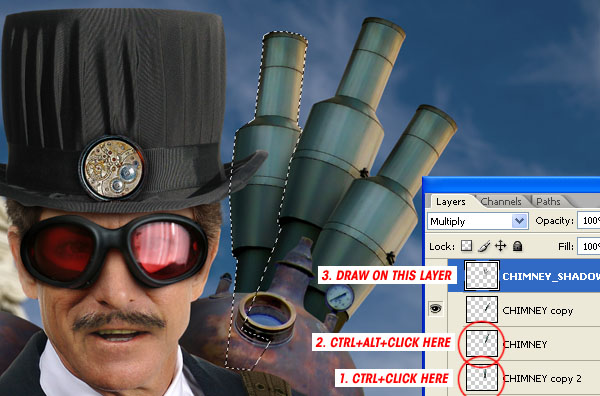
Open up the Chimney image from sxc.hu, cut it out, copy and paste it into the working document. Call it “CHIMNEY,” resize, rotate and duplicate until you have three exhausts. Create a Layer Group with the three “CHIMNEY” layers in and call it “CHIMNEYS.”
Create a new layer called “CHIMNEY_SHADOW” and set the Blend mode to Multiply. We’re going to draw shadows on this layer as we have been, but this time we’ll use the “CHIMNEY” layers to mask off the areas we want to draw on. Command-click on the “CHIMNEY” layer that you want to create a shadow for. If the selection made traps some of the other chimneys, then Command + Alt-click on the appropriate layer. Then draw shadow on the “CHIMNEY_SHADOW” layer. Check the image below for an example.
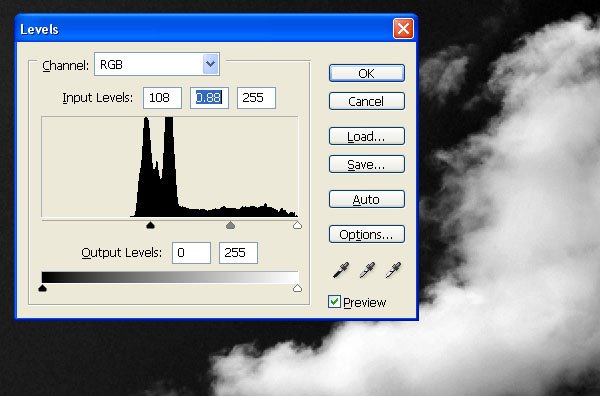
Open the Cloud image from sxc.hu and go to Image > Adjust > Desaturate. Then adjust the Levels as shown.
Select the Burn Tool, set it to Shadows at around 25% and burn all areas of the sky which aren’t yet black.
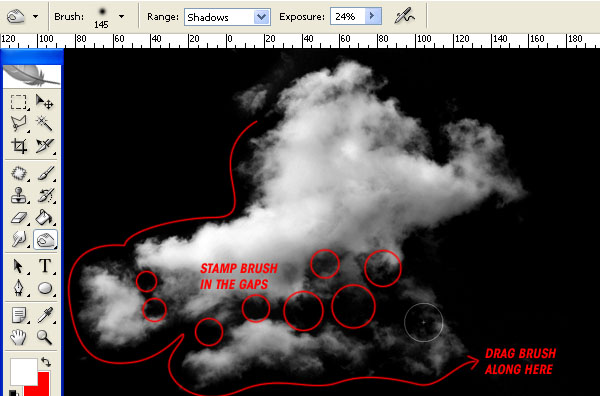
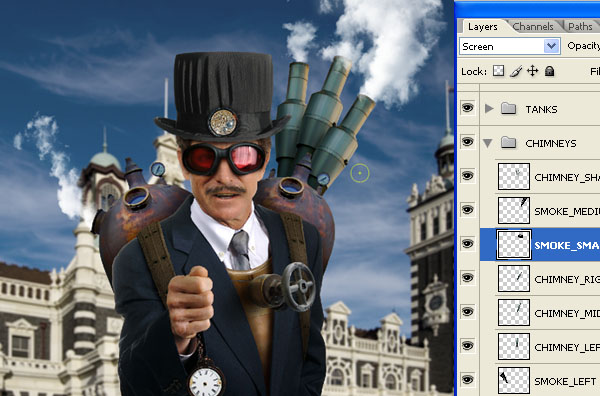
Paste the adjusted cloud image into the working document and move it into the “CHIMNEYS” group. Set the Blend Mode to Screen and call the layer “SMOKE.” If any of the sky behind the cloud is visible, then burn it out. Create duplicates of “SMOKE” and position them to appear as though they are being emitted from the chimneys. Delete areas of the smoke and play around until you have something similar to the image below. You should be able to create the same effect using just the one cloud image.
Step 13
Start building up your composition using appropriate elements. I’ve added some Cogs (from sxc.hu) and another element to the backpack area. It’s good practice to name all your layers and group them where possible. Each new element also has its own shadow layer. It’s worth mentioning that I adjusted the Cogs Hue/Saturation to give more of a brass feel.

Step 14
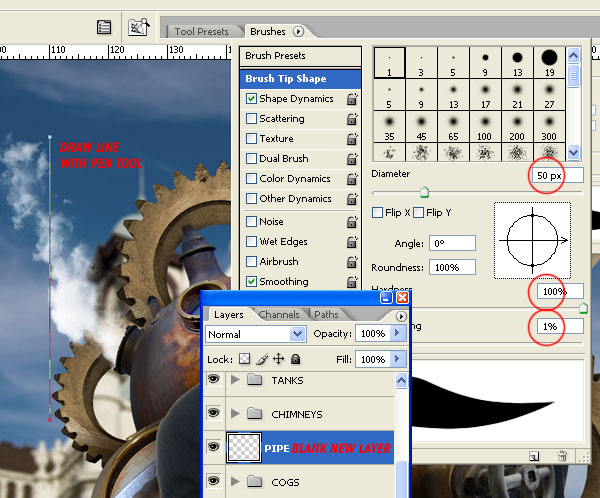
Create a new layer and call it “PIPE.” Use the Pen Tool to draw a straight line (Set to Paths not Shape Layers) and then select the Paintbrush Tool and set it up as shown.
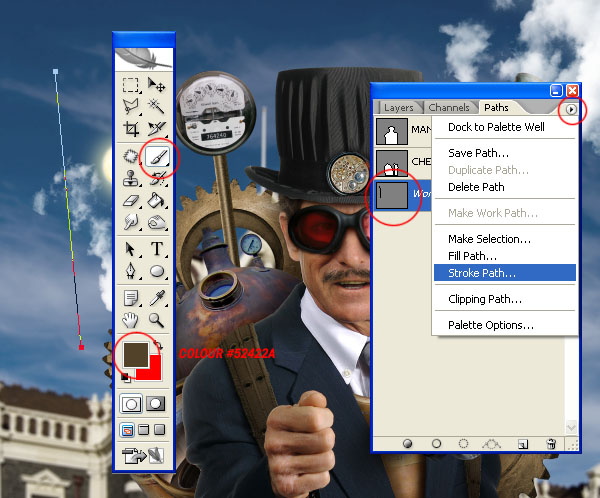
Set your foreground color to #52422b. Finally, go to the Paths palette, select the Path you’ve just drawn, and chose Stroke Path from the sub menu. Make sure the brush is set to 100% Opacity and 100% Flow.
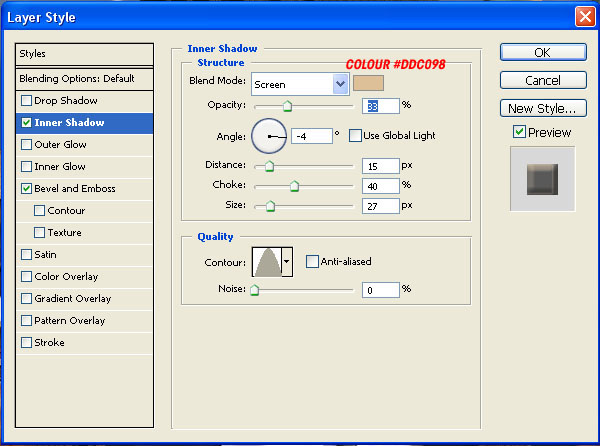
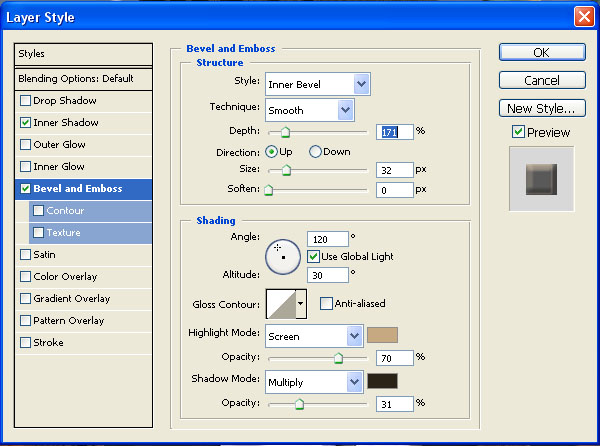
Once your Path has been stroked, go to Layer > Layer Style > Inner shadow and apply the settings as shown.
Set up Bevel and Emboss as shown.
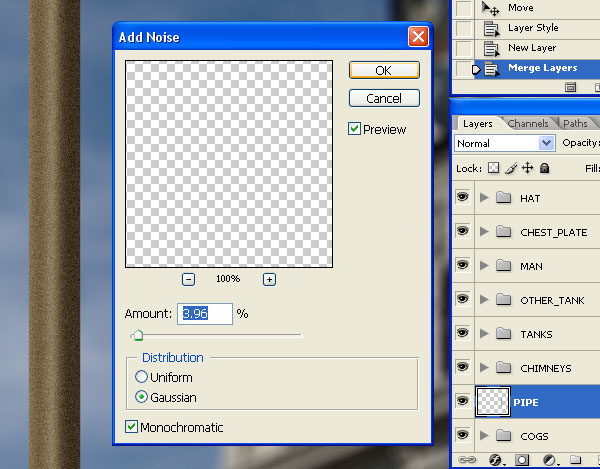
Create a blank layer under “PIPE,” select both layers and press Command + E to merge them. This will rasterize the Layer Styles.

Add a Noise Filter (Filter > Noise > Add Noise)…
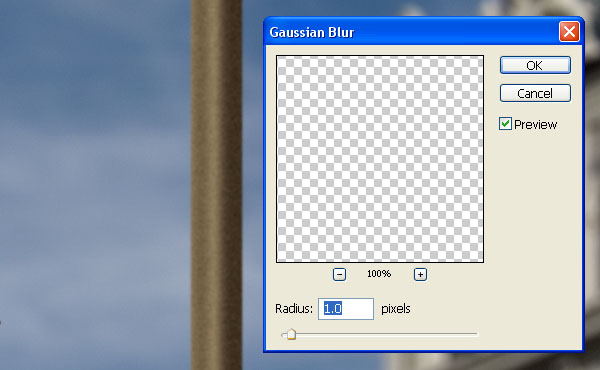
…use a 1.0 pixel Gaussian Blur (Filter > Blur > Gaussian Blur)…
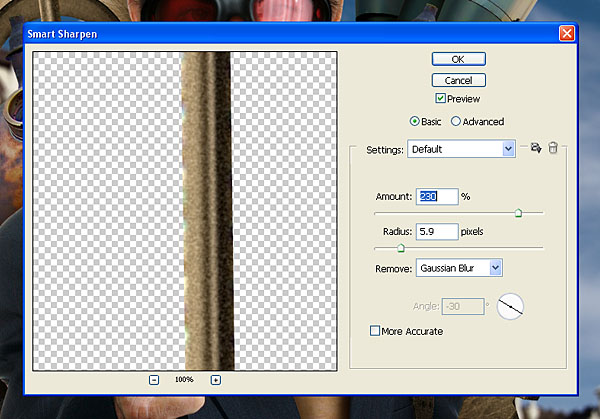
…and finally a Smart Sharpen (Filter > Sharpen > Smart Sharpen).
Step 15
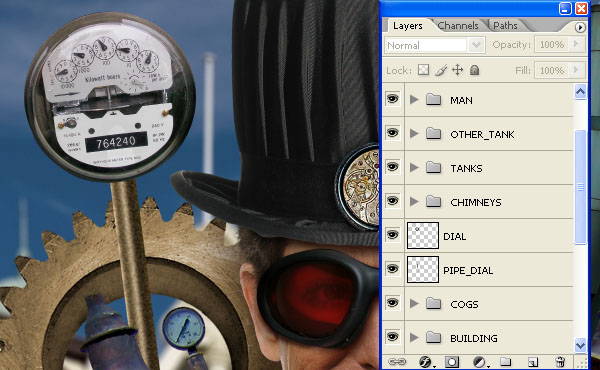
Open the Electric Meter (thanks to Phillip Flores for this image) image from sxc.hu and cut, copy and paste it into the working document. Place it directly above “PIPE” and call it “DIAL.” I’ve also changed “PIPE” to “PIPE_DIAL,” as we’ll making lots more pipes in a bit. Resize and rotate the “DIAL” to fit, rotate the “PIPE” layer to mirror the dial’s angle.
Step 16
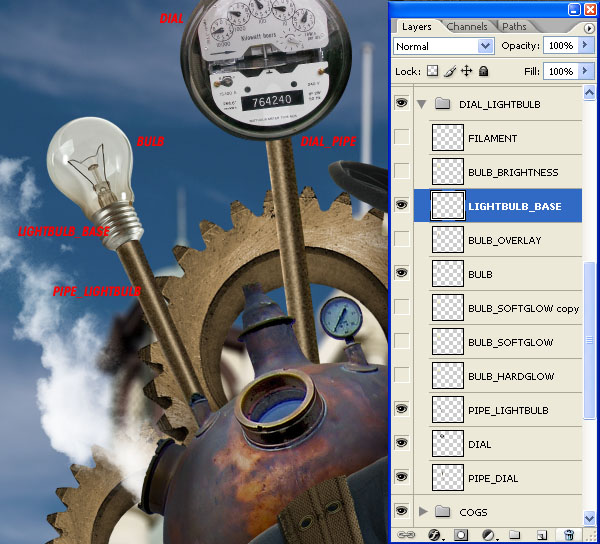
Open the the Lightbulb image from sxc.hu and cut, copy and paste it into the working document. Separate the actual bulb from the metal bit and put them on their own layers called “BULB” and “LIGHTBULB_BASE.”
Resize and rotate the “BULB” and “LIGHTBULB_BASE” layers as shown. Duplicate the “PIPE_DIAL” layer, call it “PIPE_LIGHTBULB” and rotate to align with the actual bulb.
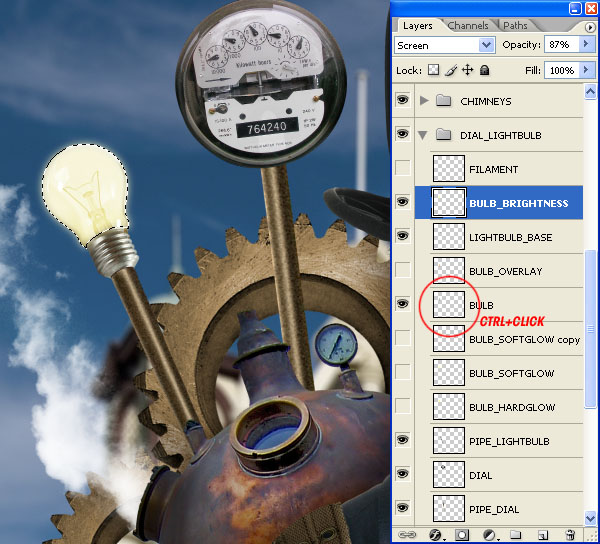
Command-click the “BULB” layer thumbnail to create a selection. Create a new layer called “BULB_BRIGHTNESS” and fill with color #fff48a. Change the layer Blend Mode to Screen and the layer Opacity to 87%. Then add a 6.0 pixel Gaussian Blur.
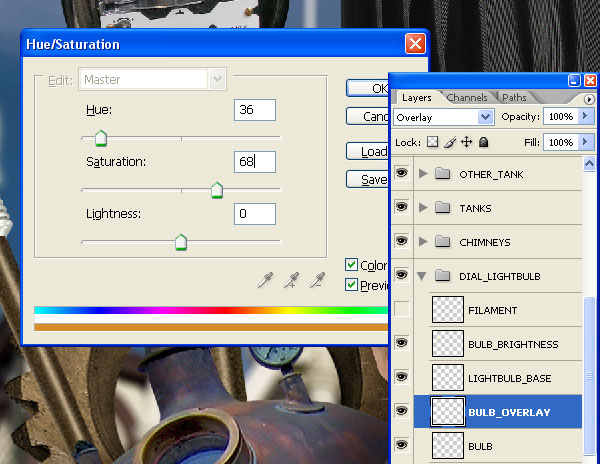
Duplicate the “BULB” layer and call it “BULB_OVERLAY.” Position it just above “BULB” in the Layers palette and adjust it’s Hue/Saturation as shown. Change the Layer Blend mode to Multiply.
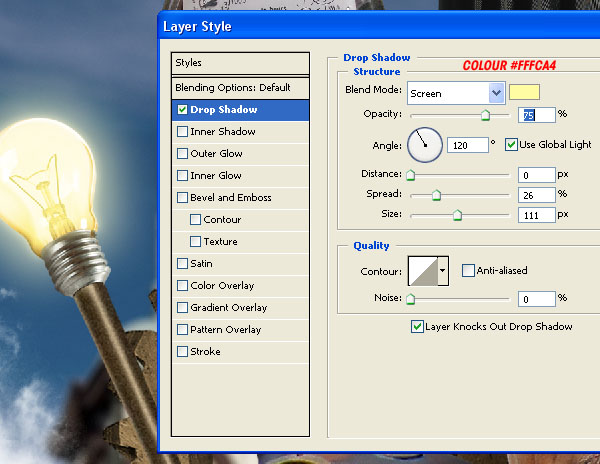
Select the “BULB” and go to Layer > Layer Styles > Drop Shadow. You can use this to create a soft glow, see below.
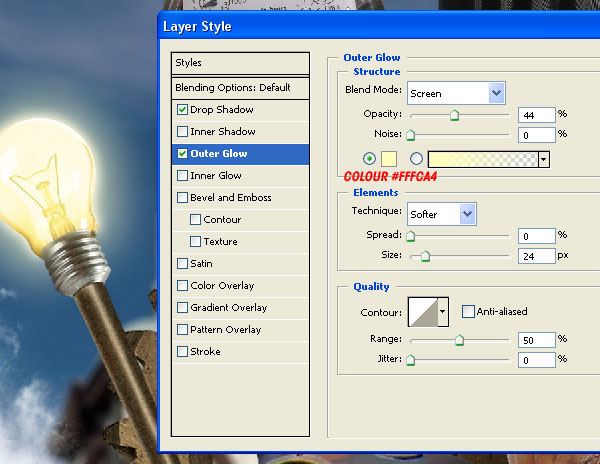
Add an Outer Glow to give a deeper glow to the “BULB.”
Step 17
Now it’s time to add a few more pipes in the same manner we did before. Give each pipe its own layer and run it through the same process as outlined in Step 14. Try different thicknesses as well.
Step 18
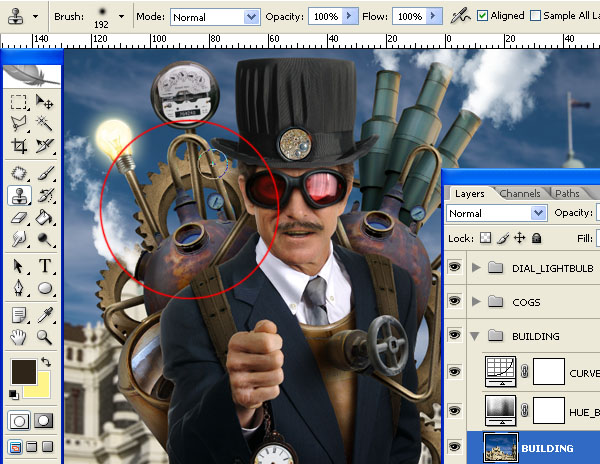
Now that the composition side of it is largely complete, I can see that some of the background is distracting. Use the Clone Stamp Tool to remove the areas of the background (“BUILDING” layer) which interfere with the foreground.
Step 19
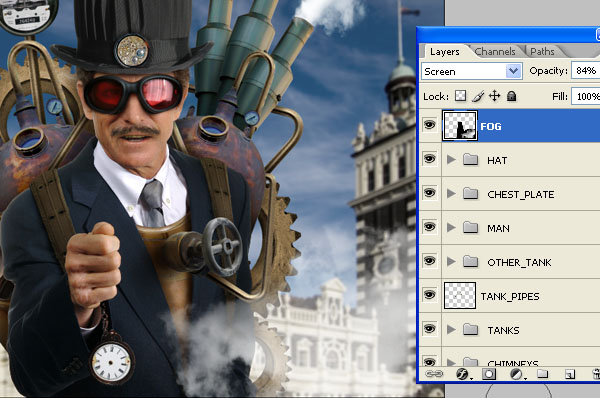
Duplicate the largest of your “SMOKE” layers and move it to the top of the Layers palette. Call this layer “FOG” and resize, rotate, and reposition so it fogs up the bottom without obscuring too much detail. Drop the layer Opacity to about 85%.
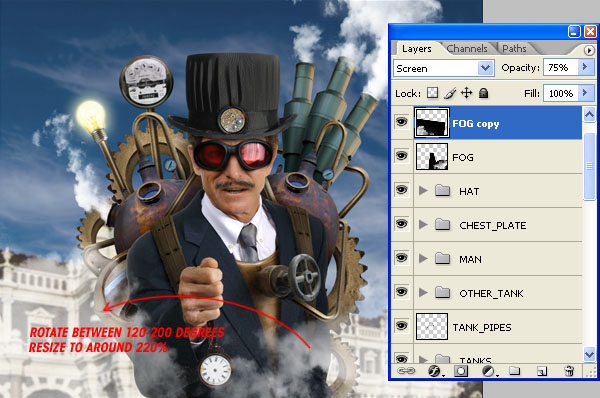
Duplicate the “FOG” and resize, rotate, and reposition it to the other side of the canvas.
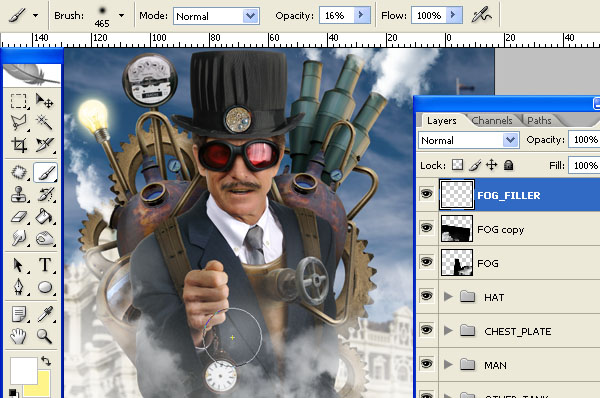
Finally, create a new layer above the “FOG” layers called “FOG_FILLER.” Use a large, soft-edged Paintbrush to stamp in bits of steam behind the “FOG” clouds. Mix up the size of the brush from between 400 pixels up to 1000 pixels. Vary the amount of times you stamp in one place to achieve different densities within the fog cloud.
Step 20
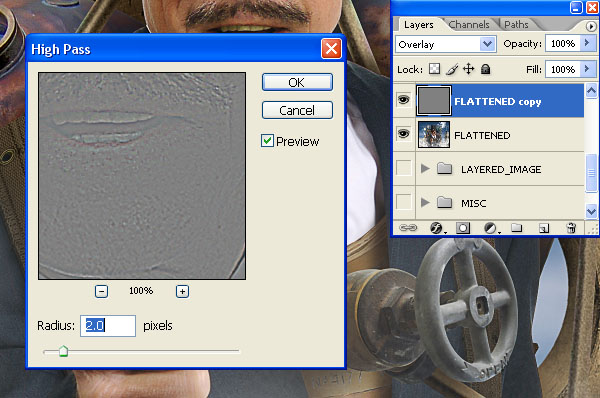
Select all your layers so far and duplicate them. Merge all the duplicated layers and call it “FLATTENED.” Duplicate “FLATTENED” and select the duplicate, then go to Filter > Other > High Pass and apply at 2.0 pixels. Change the Blend mode to Overlay.
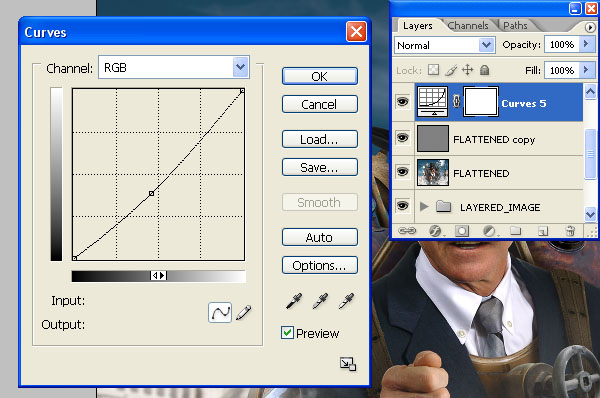
Add a curves Adjustment Layer to boost the contrast and improve the overall tones.
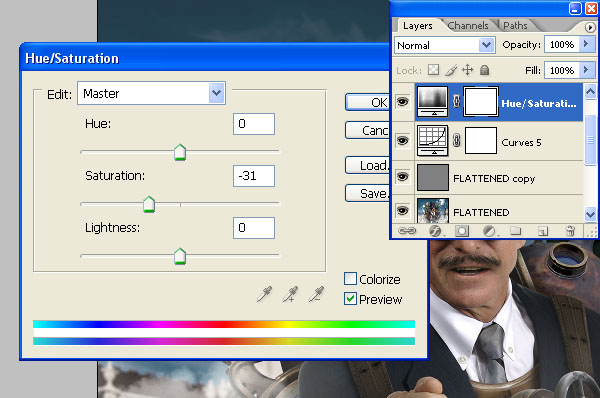
Add a Hue/Saturation Adjustment Layer to reduce saturation.
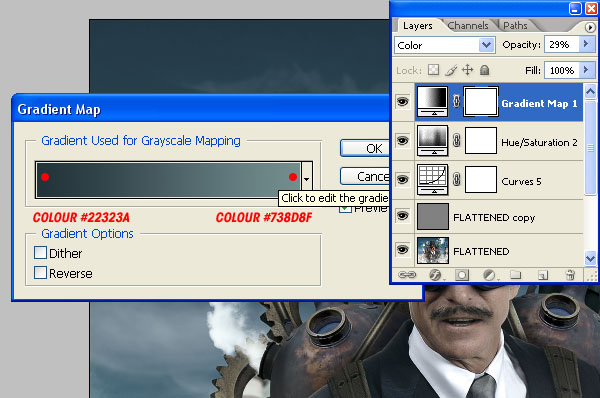
Add a Gradient Map Adjustment Layer to apply a blue color cast.
Step 21
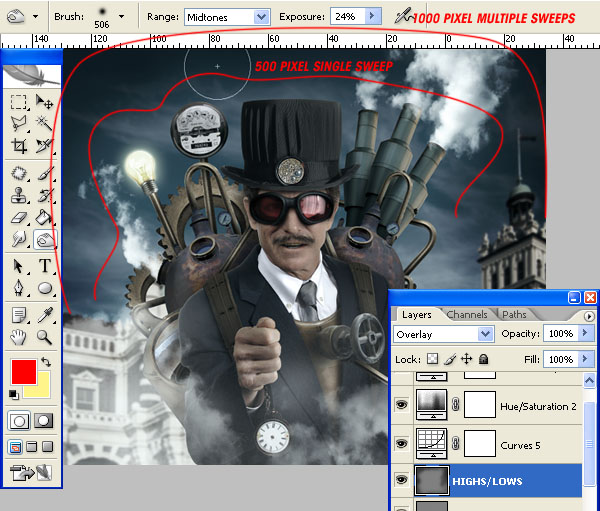
Create a new layer and call it “HIGHS/LOWS,” then fill it with 50% gray. Use the Burn Tool to burn the canvas edges, particularly in the sky area. This will add a vignette and some much needed depth to the sky. This is much easier if you have a graphics tablet.
Greatly reduce the brush size to burn in facial details. Use a brush size appropriate to the space you’re affecting. Pick out any areas in which the shadows could use a boost.
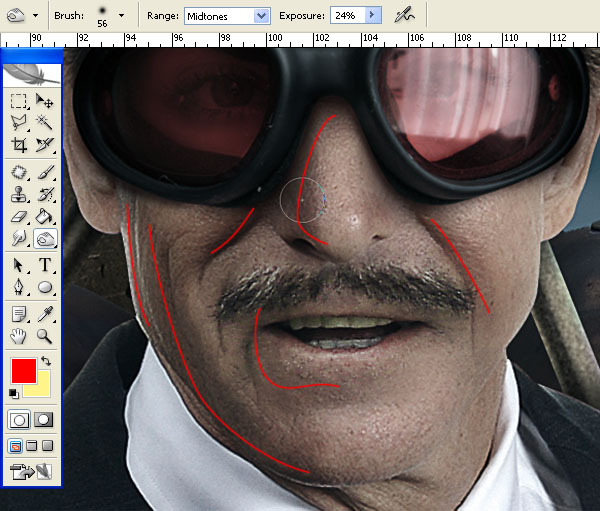
Use a very fine brush to treat the finer details such as wrinkles, lip edging, and anything else of a similar nature. Use the technique on the whole image, not just the face.
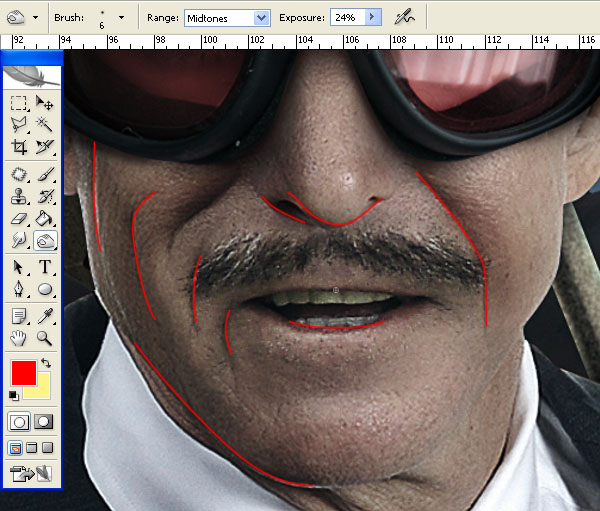
Select the Dodge Tool and using the same settings as the burning, begin to dodge areas in which you want to boost the highlights. The best approach is to just strengthen what’s already in the photo, rather than getting too creative.
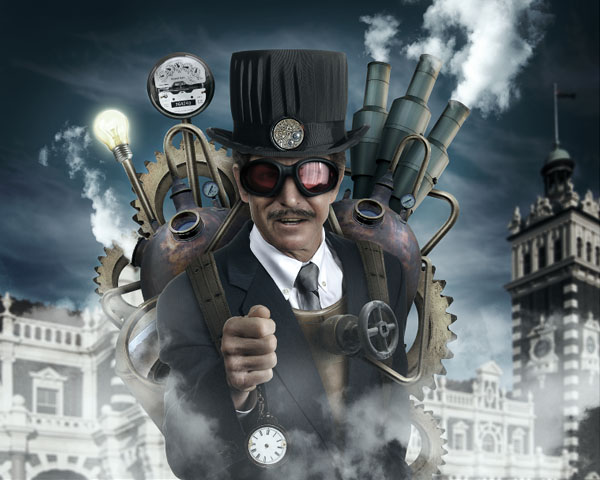
This is how it looks without “HIGH/LOWS” visible…
… and here’s the layer set to Normal rather than Overlay. Look at the areas treated and the variety in brush size.
Step 22
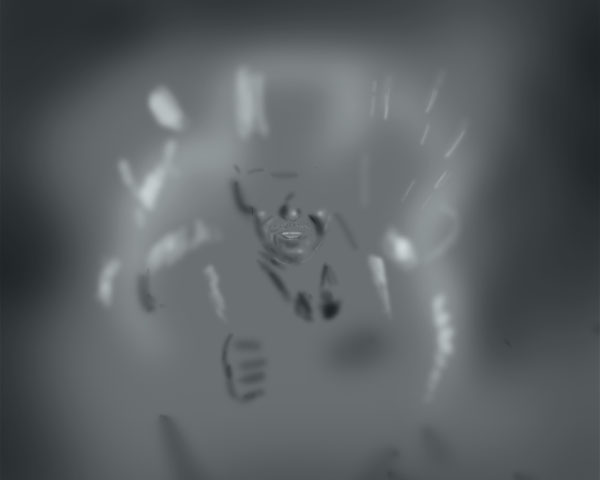
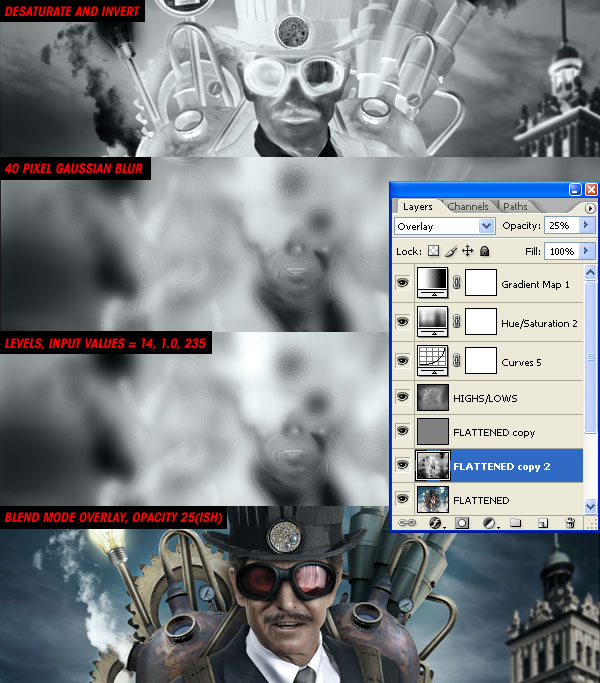
Duplicate “FLATTENED” and desaturate it and invert it. Apply a 40 pixel Gaussian blur, adjust the levels, set the layer Blend mode to Overlay and reduce the Opacity to around 25%. This will equalize the tonal balance, drawing in the ultra darks and lights across the board.
Step 23
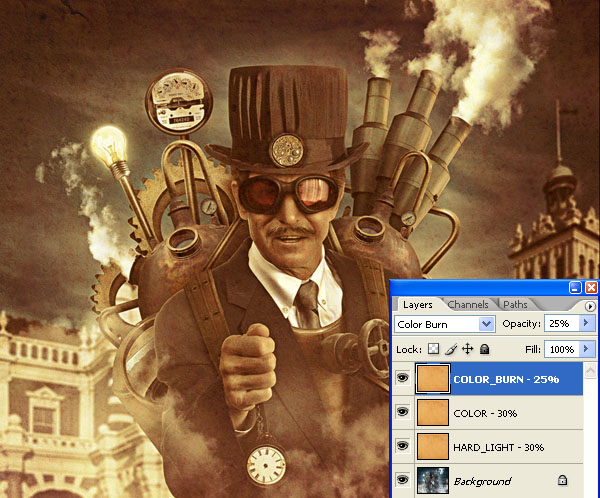
If you want to go down the ultra-stylized route, then open the Paper Texture image from sxc.hu (or any paper texture image that you like) and import it into your document. Place it at the top of the Layers palette and duplicate it twice (three layers total). Set the top layer to Color Burn at 25% Opacity.
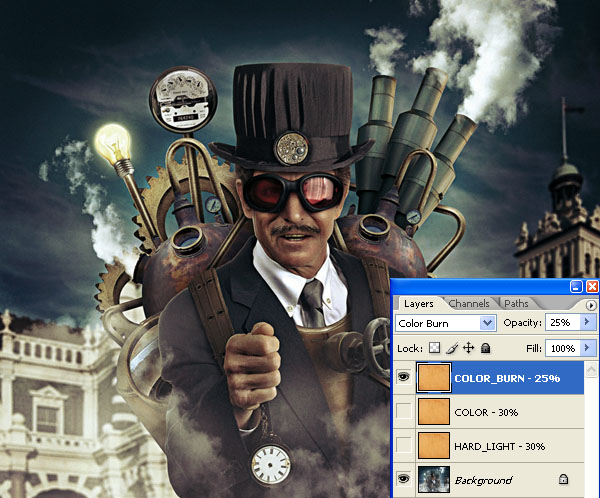
Set the second paper layer to Color at 30%.
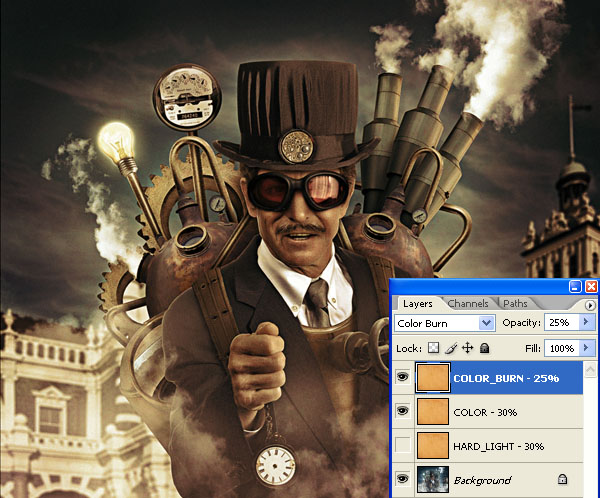
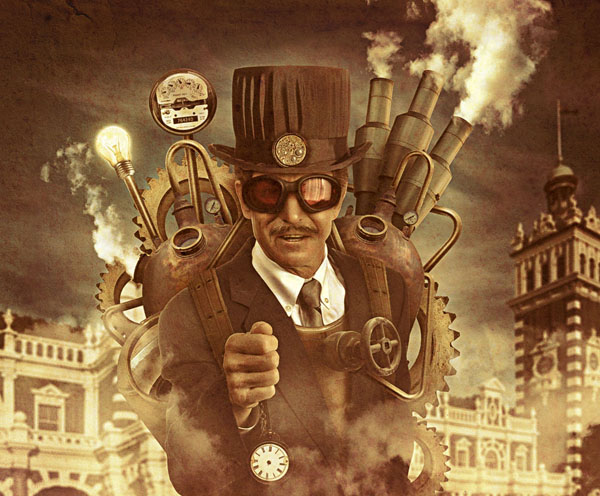
Finally, set the bottom paper layer to Hard Light at 30%. This will ensure a rich texture overlay that doesn’t kill your images contrast too much, whilst retaining the texture and image clarity.
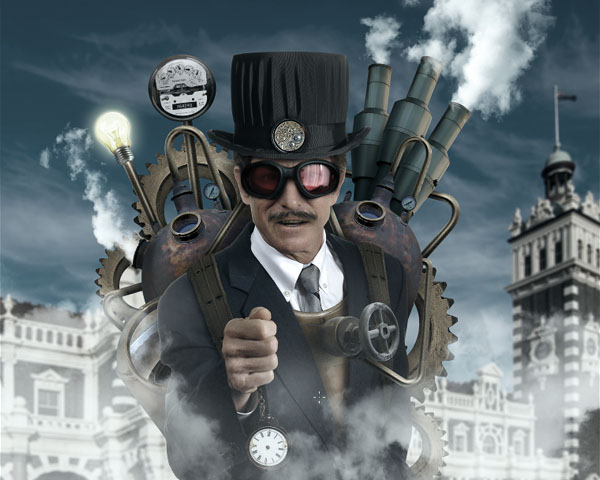
3. Conclusion
Phew! OK that was an introduction to Steampunk. Once you’ve got to grips with the style and techniques there is a world of machines, characters, and places to create. Enjoy!
Source : PSDtuts+


0 comments:
Posting Komentar